


How to Enhance Video Quality with AI Model - Top 4 Video Quality Enhancer
"Can a poor-quality video be improved? Is there any video quality enhancer recommended?" - Tom
Fortunately, the answer is yes. With the proliferation of streaming services, viewers now expect increasingly higher video quality. However, producing high-quality videos is challenging, and not everyone has the skills to manually enhance them. Nowadays, artificial intelligence (AI) technology can automatically enhance video quality, making it easier for content creators to meet audience expectations.
This tutorial will show you how to use AI model to enhance video quality, fix blurry mobile videos, improve anime videos, and stabilize shaky videos, allowing you to easily create stunning video content.

- • Part 1: How to Enhance Low-Quality Videos Downloaded in Your Early Years
- • Part 2: How to Quickly Improve the Quality of Videos Shot on Your Phone
- • Part 3: How to Fix Classic Anime Video Quality to Modern Video Quality
- • Part 4: How to Stabilize Shaky Videos and Improve Any Video Quality
- • Part 5: Benefits of Video Quality Enhancement with AI
- • Part 6: Tips for Optimizing Video Quality Enhancement Results
- • Part 7: FAQ About Enhance Video Quality
Part 1: How to Enhance Low-Quality Videos Downloaded in Your Early Years
If you have some valuable video files, tutorials, or music videos that you downloaded years ago, but their original resolution is very low, and they appear blurry when played full-screen on modern devices, then Any Video Converter can be a lifesaver.
Using AI Video Enhancer in Any Video Converter, you can upscale low-resolution videos (360p/480p) downloaded from older websites to 1080P or even 4K resolution; this process is commonly known as "super-resolution upscaling". Traditional enlargement only makes video mosaics larger, while AI Video Enhancer uses algorithms to analyze every frame in the footage, sharpening and reconstructing details to make videos appear clearer and more refined.
When early low-quality videos are played on modern large-screen TVs or 4K displays, they often exhibit noticeable flaws such as blurriness, compression artifacts, color banding, and more. After being enhanced to 1080p/4K using AI Video Enhancer, the videos appear significantly clearer and sharper on large screens, greatly improving the viewing experience. If you wish to enhance your cherished home videos or important event recordings captured with a DV camera in your early years, converting them to high definition will better preserve these precious moments for the long term.
Video Optimization 2026: Enhance, Compress, and Convert Without Losing Quality
Key Features of Any Video Converter
- Upgrade from 480P to higher 1080P, 2K, or even 4K
- AI enhances video quality throughout the entire process
- Real-time preview of video enhancement effects
- Calibrate video color, contrast, and more to correct grayness
- Remove video noise and color blocks to make the video cleaner
- Integrates video downloader and video quality enhancer into one

How to Enhance Video Quality Using AI Video Enhancer
Upload Your Low-Quality Video
Download and install Any Video Converter, then navigate to AI Video Enhancer and upload your low-quality video.
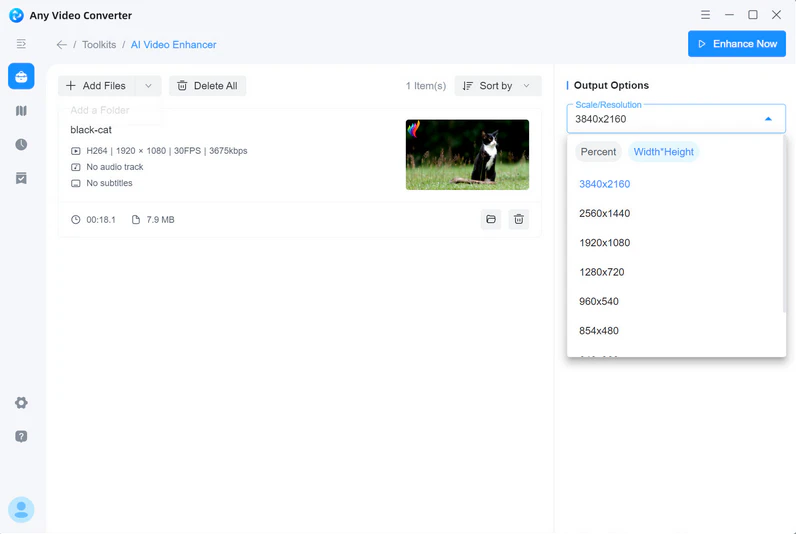
Choose Video Resolution/Size to Enhance
In Output Options, select the video resolution or size you wish to enhance.
Click "Preview Enhanced Frame" to see the enhanced effect on the left. If you're not satisfied with the enhancement, you can switch to a different video resolution/size and preview again until you're satisfied.
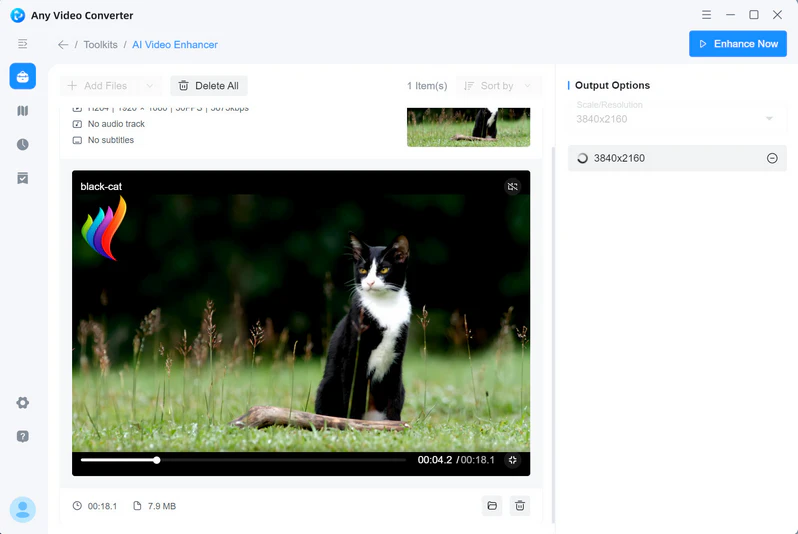
Start Enhancing Low-Quality Video
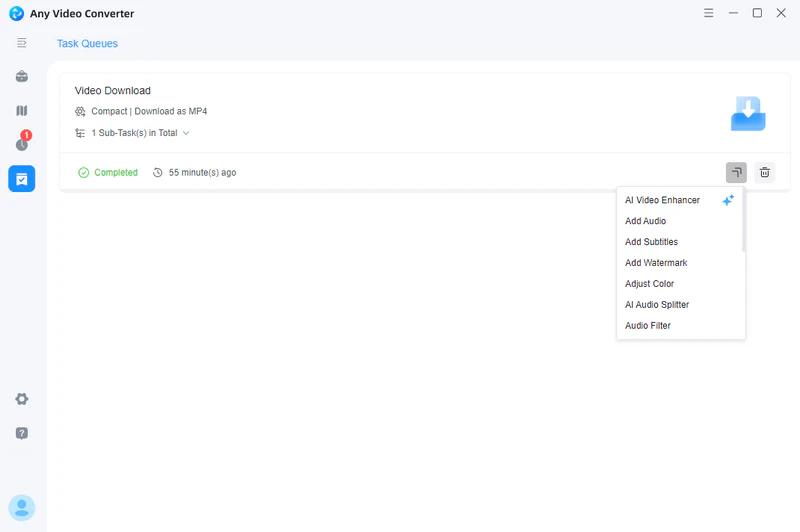
Hit the "Enhance Now" button to start enhancing low-quality video. After completing the task, you can click the "![]() " to perform basic video processing on the enhanced video.
" to perform basic video processing on the enhanced video.
Part 2: How to Quickly Improve the Quality of Videos Shot on Your Phone
If you just want to quickly enhance short videos shot on your phone, AVC AI is actually better suited for emergency use. Although it is convenient to shoot videos with a mobile phone when going out, you must have encountered problems such as low light, blurry footage, and dull colors that compromise video quality. In this situation, you can't always pull out a computer to enhance your mobile videos. That's where online video quality enhancers become a fast and efficient solution.
AVC AI acts as an "AI video retoucher". It automatically analyzes deficiencies in mobile videos through AI and performs targeted optimizations to rapidly enhance video quality to 2K, 4K, or even 8K. Free, online, and fast are its core strengths. You don't need to learn complex video editing techniques—simply upload your video to AVC AI, click the "Enhance" button, and within minutes, you'll get significantly improved results. Now you can share high-quality daily moments on social media anytime, anywhere.

How to Enhance Video Quality Using AVC AI
Step 1: Open AVC AI and upload the low-quality mobile video.
Step 2: Click "Preview" and AVC AI will automatically start enhancing the video quality and provide a five-second preview.

Step 3: If you are satisfied with the enhancement effect, click "Enhance" and then click "Download" to save the video to your computer.
Part 3: How to Fix Classic Anime Video Quality to Modern Video Quality
If you're a fan of anime videos, then Video2X is perfect for enhancing them. Although it's free and open-source, it integrates professional-grade Anime4K algorithms and frame interpolation, specifically designed for processing 480P and 720P anime videos. It intelligently repairs blurred lines and details, effectively removing noise and color distortion and improving video smoothness.
If you're an anime enthusiast with a decent NVIDIA graphics card and are proficient in software installation and parameter tuning, Video2X is a good option for enhancing anime videos. However, if you're a beginner, you might need to spend time learning parameter tuning and purchase a high-performance computer to ensure smooth operation.
How to Enhance Video Quality Using Video2X
Step 1: You can get the latest Video2X installation package from GitHub.
Step 2: After the installation is complete, click "Add tasks" to upload the anime video.
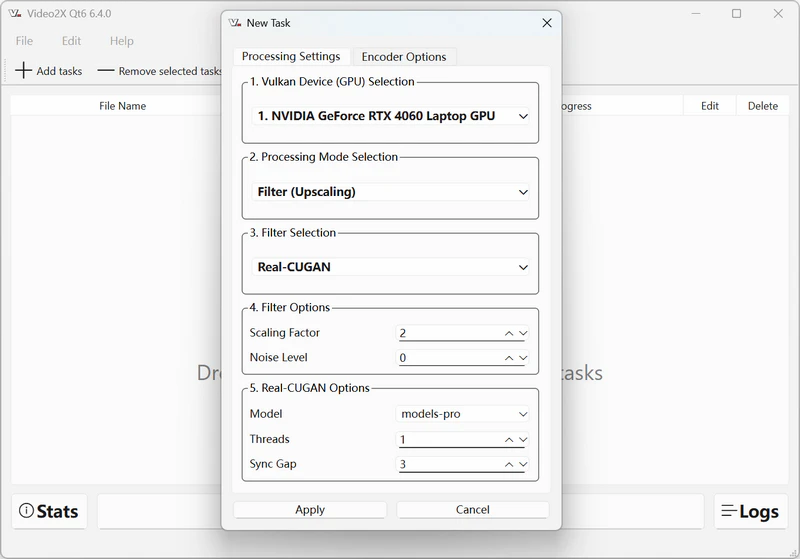
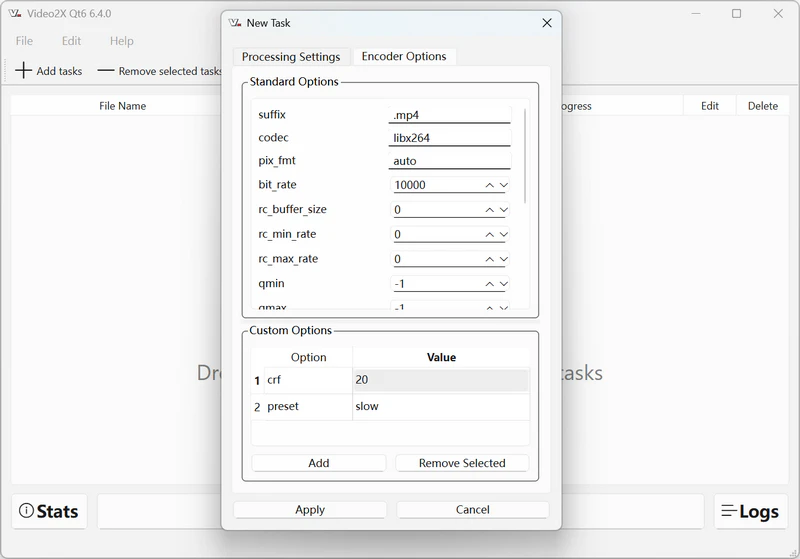
Step 3: Adjust the parameters in "Processing Settings" and "Encoder Options". The most important thing to do is select a video filter. If you want the fastest enhancement of anime videos, choose the Libplacebo filter. If you want to use a super-resolution anime model, choose Real-CUGAN.
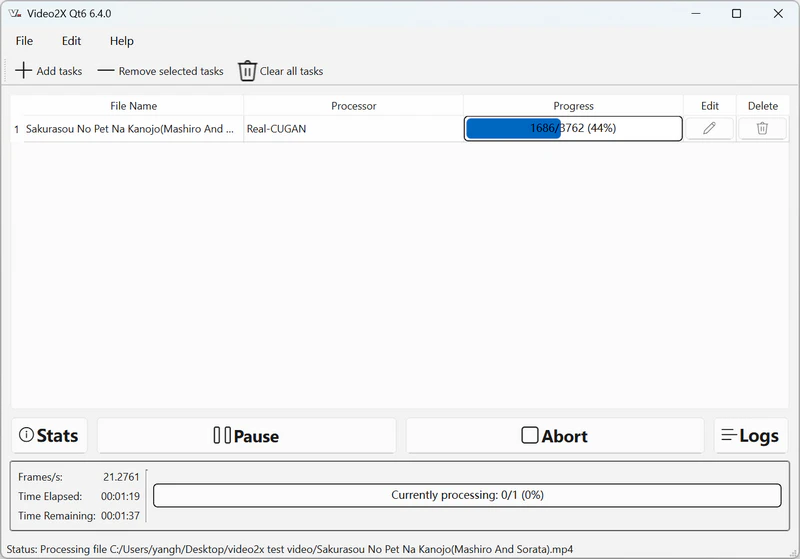
Step 4: After all parameters are completed, click "Start" to start processing the anime video.
Part 4: How to Stabilize Shaky Videos and Improve Any Video Quality
Is there a video quality enhancer that combines features to increase video resolution, improve mobile videos, and enhance anime videos? Yes, AVCLabs Video Enhancer AI is precisely such a video quality enhancer that meets diverse needs.
AVCLabs Video Enhancer AI is an automated video enhancement solution that can boost your video quality with just a few clicks. It uses AI-powered algorithms to improve the visual quality of your videos and reduce visual noise for crystal-clear results. It effectively eliminates video noise and blur, features deinterlacing capabilities, enhances facial details, and includes a dedicated AI Anime model optimized for anime videos. Enhance your workflow with AI automation, delivering professional-grade video enhancement with simple steps. No advanced video editing skills are needed.
This video quality enhancer offers 6 AI features:
AVCLabs Video Enhancer AI Crack 2026 >>
Key Features of AVCLabs Video Enhancer AI
- Enhance the video quality to make them more pleasing
- Upscale videos from SD to HD, HD to 4K, and even 8K
- Sharpen faces from blurry video and enhance facial details
- Support deinterlacing videos as well as stabilizing shaky video
- Support GPU acceleration to deliver up to 3X faster processing
How to Enhance Video Quality Using AVCLabs Video Enhancer AI
Install and Launch AVCLabs Video Enhancer AI
Warm reminder: Before enhancing video quality, simply click here to check the system and hardware requirements of AVCLabs Video Enhancer AI.

Upload Low-Quality Videos and Select the AI Model
Drop one or multiple low-quality videos in Video Enhancer AI, then you need to modify some critical parameters like processing AI model, output resolution, output format and output path, brightness, contrast, and saturation. If you want to enhance anime videos, you can choose the "Anime" model in "AI Enhancement". If you want to increase the video resolution, you can choose 1080P, 2K, 4K, or even 8K.
If you're unsure about the parameter values, you can click "Preview" to see the effects in real time and make adjustments until you're satisfied.

Start Enhancing Video Quality
Once all the preparation work is done, click on the Export button to enhance video quality automatically.
The final processing time depends on your computer’s system configuration, video size. Please wait patiently.

Part 5: Benefits of Video Quality Enhancement with AI
Video quality optimization is a significant part of video production, but it can be challenging to achieve manually. This is especially true if you are working with a large volume of content and don't have the time or resources to perform quality checks every time. Fortunately, AI can simplify the process of video quality enhancement, so you can speed up your workflow without sacrificing quality. With the following benefits, automating the video quality enhancement process with AI can help you achieve greater efficiency and profitability.
1. Enhanced Viewing Experience
UHD video resolution upscales 480P and 720P to 1080P, 4K, and even 8K, enhancing video detail and delivering superior viewing quality on modern large-screen devices. High frame rate video intelligently interpolates 24fps and 30fps videos to 60fps and 120fps, significantly reducing motion blur and stuttering.
2. Restoring and Preserving Precious Videos
This is one of the most significant applications of AI video enhancement. It can automatically restore precious historical documentaries, old movies, and home videos, including denoising, coloring, interpolating frames, and stabilizing images, preserving clearer and more vivid historical materials for future generations.
3. Improve the Value of Video
YouTubers and video creators can use AI tools to easily improve the quality of their original videos, making the content more professional and attractive, thereby increasing subscribers and followers.
Part 6: Tips for Optimizing Video Quality Enhancement Results
Before you begin the video quality enhancement work, there are a few things you should keep in mind.
1. Pre-Shooting Preparations
Shoot your video at the highest resolution (4K). Even if the final output is 1080P, 4K footage retains more detail when enhanced in post-production. Frame rate, bitrate, exposure, focus, and other factors are crucial, and you'll need to adjust the correct parameters when shooting your video.
2. Post-Production Enhancement Techniques
Use professional software such as Any Video Converter and AVCLabs Video Enhancer AI to reduce noise and reshape details in videos with AI. Low-resolution videos can also be enlarged, and appropriate adjustment of contrast and saturation can make the video more vivid.
3. Final Output Parameters
When exporting videos, select the correct codec (H.264/H.265/AV1) and bitrate. For 1080P videos, we recommend 10 - 20 Mbps, and for 4K videos, consider 35 - 50 Mbps or higher.
Part 7: FAQ About Enhance Video Quality
Q1: Which is better? AVCLabs Video Enhancer AI or Any Video Converter?
It depends on different needs. Any Video Converter has quite a few video tools, such as downloading videos, converting formats, cropping, separating audio, enhancing video quality, etc. AVCLabs Video Enhancer AI focuses on AI video enhancement, capable of upgrading low-resolution videos to 1080P, 4K, and even 8K, coloring black-and-white videos, reducing noise, deblurring, and enhancing facial details.
If you are in pursuit of AI video enhancement effects, such as making blurry videos clear or restoring old videos, AVCLabs Video Enhancer AI is a more suitable choice. But if you just need a fully functional video conversion and enhancing tool, then Any Video Converter is more practical.
Q2: Does 720P upscaled to 1080P look good?
The quality of the upgraded effect mainly depends on the following aspects:
1. Original video quality: If the original video is a high-quality 720P video, then upgrading it to 1080P using AI can effectively optimize video defects.
2. Screen size: On small-sized displays like mobile phones and tablets, upgrading 720P videos to 1080P usually looks better. However, on large-sized TV screens, you may find that 1080P videos are full of flaws.
3. Video content: Animated videos have clear lines and distinct color blocks, so usually their upgrade effect is better. Live-action films or documentaries have relatively high requirements for detail restoration, and there may be different effects after upgrading.
Overall, the effect of upscaling a 720P video to 1080P using AI algorithms won't be too bad.
Q3: Will the video quality enhancer affect the format of the original video?
No. Any Video Converter and AVCLabs Video Enhancer AI do not change the original format of the video. AVCLabs Video Enhancer AI even allows you to manually select the output format of the video.
Q4: What types of videos can I enhance?
You can enhance any video, such as mobile phone recordings, videos downloaded from the Internet, surveillance recorders, black-and-white videos, camera videos, and so on.
Q5: Can I enhance videos for free?
Both Any Video Converter and AVCLabs Video Enhancer AI offer free trial versions.
Conclusion
AI video quality enhancers provide a powerful and convenient solution for improving video quality. Whether you're repairing low-resolution videos downloaded from years past, optimizing short films shot on your phone, enhancing the quality of classic anime, or professionally stabilizing shaky footage, there are dedicated AI tools: Any Video Converter, AVC AI, Video2X, and AVCLabs Video Enhancer AI. These video quality enhancers help you easily upgrade video quality, restore detail, and enhance smoothness.
In short, AI video enhancement is changing the way you process video, making the creation of high-quality video content more accessible and efficient. By choosing the right tools and following the optimization recommendations, everyone can easily create clearer, more vivid videos.


Besty Smith | Content Writer
Besty Smith is a talented and insightful content creator with a keen interest and passion for software programs. She focuses on in-depth research and hands-on experience with various types of software, providing readers with in-depth and inspiring content through precise writing. With her keen insight into the software industry, Besty is committed to helping readers keep abreast of the latest industry trends so that they can stay competitive in the digital age.
